
RGB - Additive Colours

CMYK - Subtractive Colours
Colour when sent to print uses a coding language that tries to interoperate the colours used when designing on screen. To solve this problem we must always use the CMYK colour mode when
designing for print.
Computer monitors emit color as RGB (red, green, blue) light. Although all colors of the visible spectrum can be produced by merging red, green and blue light, monitors are capable of displaying only a limited gamut (i.e., range) of the visible spectrum.
CMYK versus RGB color spectrum

Visible colour spectrum
Whereas monitors emit light, inked paper absorbs or reflects specific wavelengths. Cyan, magenta and yellow pigments serve as filters, subtracting varying degrees of red, green and blue from white light to produce a selective gamut of spectral colors. Like monitors, printing inks also produce a color gamut that is only a subset of the visible spectrum, although the range is not the same for both. Consequently, the same art displayed on a computer monitor may not match to that printed in a publication. Also, because printing processes such as offset lithography use CMYK (cyan, magenta, yellow, black) inks, digital art must be converted to CMYK color for print. Some printers prefer digital art files be supplied in the RGB color space with ICC profiles attached. Images can then be converted to the CMYK color space by the printer using color management methods that honor profiles if present; this helps preserve the best possible detail and vibrancy.
Hexachrome
Hexachrome is an ultra-high fidelity six-color process printing system developed by Pantone, Inc. It's large color gamut, compared to four-color process printing, makes it possible for the first time to more accurately reproduce a wide range of both vibrant and subtle colors that can be defined and displayed on computer monitors which previously could not be duplicated in print.

In Hexachrome, the existing CMYK primaries were modified into more chromatic inks, with orange and green being added to the traditional equation. In addition to reproducing more brilliant continuous-tone images, Hexachrome is capable of accurately reproducing over 90% of the PANTONE MATCHING SYSTEM® Colors, almost twice the number that can be obtained using conventional four-color process printing. This Designer Hexachrome Primer will show how to create a design using QuarkXPress™ that includes image separations using an Adobe® Photoshop® plug-in called PANTONE HexImage™, creating vector art in Adobe® Illustrator® with the PANTONE HexVector® plug-in, and creating a layout in QuarkXPress 4.0.4 with Hexachrome colors.
The prepress workflow for Hexachrome is similar to traditional CMYK, but color management systems need to be properly set up and plug-ins are required to enable support for Hexachrome in applications that do not have built in support. The printing workflow is the same as conventional process printing except there is six of everything instead of four.
Desktop scanners & colour space
Most desktop scanners, digital cameras, and video capture systems save files as RGB and the conversion of RGB files to CMYK can be done in many ways.
RGB converts to only CMY directly. However, when printing, we must add black ink and in doing so must cut back on some color. The Undercolor Removal (UCR) setup will help control this ratio so that a maximum ink density for the four colors will be 300% when printing on a coated paper stock.
Image halftones

half toning screen angles
In offset lithography, the density of CMYK inks can not be varied in continuous fashion across an image, so a range is produced by means of halftoning. In halftoning, translucent CMYK ink dots of variable size are printed in overlapping grids. Grids are placed at different angles for each of the ink colors. Smaller halftone dots absorb less light; thus, as a result of an increase in the amount of reflected light, apparent density is decreased and the object appears lighter.
Monotone

A Monotone image is an image that has been created by using different tones of the same colour. Any colour can be used when using this printing process however in print terms it is more commonly used to produce grey scale images made from black ink.
Duotones

a duotone is a halftone that is printed in two colours which are usually black and another colour. One plate prints the black which pick up all the shadow and the highlight areas and another plate prints the colour which picks up all the middle tones. When printed together, a monochromatic reproduction which gives us a full range of tones.
PPI

Pixels per inch (PPI) or pixel density is a measurement of the resolution of devices in various contexts: typically computer displays, image scanners, and digital camera image sensors. PI can also describe the resolution, in pixels, of an image to be printed within a specified space. Note, the unit is not square inches. For instance, a 100×100 pixel image that is printed in a 1-inch square has a resolution of 100 pixels per inch (PPI). Used in this way, the measurement is meaningful when printing an image.
Good quality photographs usually require 300 pixels per inch, at 100% size, when printed onto coated paper stock, using a printing screen of 150 lines per inch (lpi). This delivers a quality factor of 2, which delivers optimum quality. The lowest acceptable quality factor is considered to be 1.5, which equates to printing a 175ppi image using a 150 lpi screen onto coated paper. Screen frequency is determined by the type of paper that the image is to be printed on. An absorbent paper surface, uncoated recycled paper for instance, will allow the droplets of ink to spread (dot gain), and so requires a more open printing screen.
How CMYK works in Print & using Rich Black

CMYK value refers to a set of 4 numbers between one and 100 representing the amount of each color mixed in order to achieve the desired color.
The initial guess from this information would be that K=100 would be solid black but this is far from the truth. In actual fact, this creates a dark grey. To make RICH black. CMYK adds bits of cyan, magenta and yellow to make the key darker in order to achieve rich black.
It is important however to not use RICH black for small text for obvious reasons. CMY and K are printed in slightly separate positions overlapping which will make small body copy appear blurred when printed.
Colour Matching Systems
PANTONE
___Pantone
This is the dominant colour printing system in the US and Europe.
___Toyo
This is a common spot colour system used in Japan.
___Anpa
This is a pallete of 300 colours that is specified by the ‘American Newspapers Publishing Association’ for the usage of spot colours in Newspapers.
___RAL
This is a colour matching system that is used in Europe. It is mainly used for varnish and powder coating.
DPI

DPI is not really used to describe the resolution number of dots per inch in a digital print and the printing resolution of a hard copy print dot gain; the increase in the size of the halftone dots during printing. This is caused by the spreading of ink on the surface of the media.
Up to a point, printers with higher DPI produce clearer and more detailed output. A printer does not necessarily have a single DPI measurement; it is dependent on print mode, which is usually influenced by driver settings. The range of DPI supported by a printer is most dependent on the print head technology it uses. A dot matrix printer, for example, applies ink via tiny rods striking an ink ribbon, and has a relatively low resolution, typically in the range of 60 to 90 DPI. An inkjet printer sprays ink through tiny nozzles, and is typically capable of 300-600 DPI. A laser printer applies toner through a controlled electrostatic charge, and may be in the range of 600 to 1,800 DPI.
Hue, Saturation, Brightness
Colour Matching Systems
PANTONE
The Pantone Color Matching System is largely a standardized color reproduction system. By standardizing the colors, different manufacturers in different locations can all refer to the Pantone system to make sure colors match without direct contact with one another.
One such use is standardizing colors in the CMYK process. The CMYK process is a method of printing color by using four inks — cyan, magenta, yellow, and black. A majority of the world's printed material is produced using the CMYK process, and there is a special subset of Pantone colors that can be reproduced using CMYK . Those that are possible to simulate through the CMYK process are labeled as such within the company's guides.
However, most of the Pantone system's 1,114 spot colors cannot be simulated with CMYK but with 13 base pigments (15 including white and black) mixed in specified amounts.
___Pantone
This is the dominant colour printing system in the US and Europe.
___Toyo
This is a common spot colour system used in Japan.
___Anpa
This is a pallete of 300 colours that is specified by the ‘American Newspapers Publishing Association’ for the usage of spot colours in Newspapers.
___RAL
This is a colour matching system that is used in Europe. It is mainly used for varnish and powder coating.
DPI
DPI is not really used to describe the resolution number of dots per inch in a digital print and the printing resolution of a hard copy print dot gain; the increase in the size of the halftone dots during printing. This is caused by the spreading of ink on the surface of the media.
Up to a point, printers with higher DPI produce clearer and more detailed output. A printer does not necessarily have a single DPI measurement; it is dependent on print mode, which is usually influenced by driver settings. The range of DPI supported by a printer is most dependent on the print head technology it uses. A dot matrix printer, for example, applies ink via tiny rods striking an ink ribbon, and has a relatively low resolution, typically in the range of 60 to 90 DPI. An inkjet printer sprays ink through tiny nozzles, and is typically capable of 300-600 DPI. A laser printer applies toner through a controlled electrostatic charge, and may be in the range of 600 to 1,800 DPI.
Hue, Saturation, Brightness
Hue, saturation, and brightness are aspects of color in the red, green, and blue ( RGB ) scheme. These terms are most often used in reference to the color of each pixel in a cathode ray tube ( CRT ) display. All possible colors can be specified according to hue, saturation, and brightness (also called brilliance ), just as colors can be represented in terms of the R, G, and B components.
Most sources of visible light contain energy over a band of wavelengths.
Hue is the wavelength within the visible-light spectrum at which the energy output from a source is greatest. This is shown as the peak of the curves in the accompanying graph of intensity versus wavelength. In this example, all three colors have the same hue, with a wavelength slightly longer than 500 nanometers, in the yellow-green portion of the spectrum.
Saturation is an expression for the relative bandwidth of the visible output from a light source. In the diagram, the saturation is represented by the steepness of the slopes of the curves. Here, the red curve represents a color having low saturation, the green curve represents a color having greater saturation, and the blue curve represents a color with fairly high saturation. As saturation increases, colors appear more "pure." As saturation decreases, colors appear more "washed-out."
Brightness is a relative expression of the intensity of the energy output of a visible light source. It can be expressed as a total energy value (different for each of the curves in the diagram), or as the amplitude at the wavelength where the intensity is greatest (identical for all three curves). In the RGB color model, the amplitudes of red, green, and blue for a particular color can each range from 0 to 100 percent of full brilliance. These levels are represented by the range of decimal numbers from 0 to 255, or hexadecimal numbers from 00 to FF.
Resolution
Resolution is basically the measurement of how many dots/pixels fit into one inch.
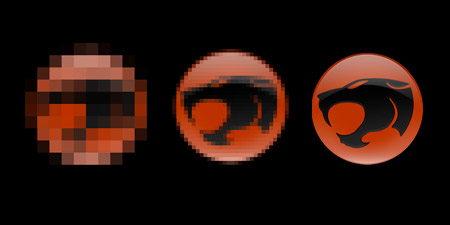
The resolution of an image refers to the density of the pixels (or printed dots) that make up that image or graphic. The higher the resolution, the crisper and more detailed the image will be. A lower resolution will be fuzzy, and less detailed. Image resolutions are measured in DPI (Dots Per Inch) and PPI (Pixels Per Inch). There are differences between the two
The higher resolution, the sharper the image will be. The recommended resolution is 300 dpi (dots per inch) for crisp, clear results as most printers are set to 300dpi or even 600dpi. Lower resolution images appear fuzzy, jagged and blurry.
When altering an image size in Photoshop you have two options, resize or resample. If you resample (the default option in Photoshop), you’re altering the pixel size of the document. If you resize (Uncheck the resample box), you’re altering the resolution and therefore the printed size of the document.
As we know, resampling a document up is bad. Photoshop will have to guess what pixels to insert into the gaps. Resampling a document down is OK, as we’ve already got more than the amount of pixels we need.
If you Resize an image, you’ll keep the same pixel size, but alter the actual print size and the resolution.
Total Area Coverage (TAC)

Image file formats are standardized means of organizing and storing digital images. Image files are composed of digital data in one of these formats that can be rasterized for use on a computer display or printer. An image file format may store data in uncompressed, compressed, or vector formats. Once rasterized, an image becomes a grid of pixels, each of which has a number of bits to designate its color equal to the color depth of the device displaying it.
Lossless compression algorithms reduce file size while preserving a perfect copy of the original uncompressed image. Lossless compression generally, but not exclusively, results in larger files than lossy compression. Lossless compression should be used to avoid accumulating stages of re-compression when editing images.
Lossy compression algorithms preserve a representation of the original uncompressed image that may appear to be a perfect copy, but it is not a perfect copy. Oftentimes lossy compression is able to achieve smaller file sizes than lossless compression. Most lossy compression algorithms allow for variable compression that trades image quality for file size.
JPEG (Joint Photographic Experts Group) is a compression method; JPEG compression is (in most cases) lossy compression. The JPEG/JFIF filename extension is JPG or JPEG. Nearly every digital camera can save images in the JPEG/JFIF format, which supports 8-bit grayscale images and 24-bit color images (8 bits each for red, green, and blue).
JPEG compression is a "lossy" format where pixel information is thrown away to reduce file size. Algorithms rebuild the discarded data when the file is decompressed. LZW compression within the TIFF format is a lossless method, replacing repeating code with a tag which is replaced when the file is decompressed.
TrueType is an outline font standard developed by Apple computer in the late 1980s as a competitor to Adobe's Type 1 fonts used in Postscript. It has become the most common format for fonts on both the Mac OS and Windows operating systems.
The outlines of the characters (or glyphs) in TrueType fonts are made of straight line segments and quadratic Bezier Curves. These curves are mathematically simpler and faster to process than cubic Bézier curves, which are used both in the PostScript fonts.
It it useful to use TrueType fonts for print because they was purposely designed to look exactly the same on paper as they do on screen.
Nearly all books, newspapers, and magazines use a serif font for body copy. It's popularly accepted that – in print – serif fonts are easier to read. The idea being that the serifs actually make the letters flow together – and subsequently easier on the eyes.
The conclusion being that serif fonts are easier to read when it comes to fonts on paper. So, if you're sending out a sales letter or brochure in the mail, you probably want to use serif font (but, as mentioned in the first point, you could use sans-serif font for your headlines).
If you wish to reproduce a large solid black background I would recommend that the black prints at 100 per cent, along with a 40 per cent cyan tint to provide more density. This is often referred to as a "shiner", and produces what is sometimes called a "rich black".
The inclusion of a common colour background or strap heading across several pages of a feature or sections of a magazine can draw attention to the natural minor variations in colour balance that occur across a press/presses and during a press run. This can be minimised by creating these common colours out of as few process colours as possible. Give careful consideration to the use of one, or perhaps two colours to produce the common colour. Such a colour will enable a more consistent reproduction than the same object defined using all four process colours. However, certain two-colour combinations can also be prone to unattractive colour shifts - particularly when both colour values are midtones. Two-colour combinations where one colour is considerably higher than the other prove more stable, producing a more consistent, balanced result.
To assure accurate reproduction on press it is advisable to supply a colour swatch or contract-colour proof.
Tracking
Tracking occurs when ink is consumed by an area of a sheet with a high percentage of one or more colours, creating a deficiency of that colour within a later area running in track. This effect is more evident on heavy tint areas running across the sheet. To avoid the effects of tracking it is important to consider the final imposition and design your layout accordingly.
Black overprint
100% black elements will automatically overprint other colours. This prevents normal black text knocking "holes" in tints. Therefore, it is important that larger 100% black page elements, such as boxes or very large point size text, do not have variations in colour beneath them. These will show through in the printed page. Alternatively a "shiner" (see above) can be used to produce a heavier, more consistent solid. If a black element is overprinting a four-colour image, include at least 1% pf CMY in your black to ensure the picture does not show through the black.
Trims and Bleeds
All page content that runs to the edge of the page must extend off the page by a minimum distance of 3 mm. This minimum distance is referred to as bleed. If bleed is not applied there is a risk of an unsightly white area appearing at the bleed edge.
Elements that do not bleed should be a minimum distance of 5 mm from the edge of the page. This is referred to as the margin. Elements closer to the edge than this standard risk being trimmed off during the finishing process.
Do not attempt to place text sitting exactly on the trim - you will almost certainly be disappointed with the finished trimmed result.
Consideration should be given to the binding style when setting the margins.
For perfect-bound titles consideration should be given for the area in the backs lost in the spine glueing.
For wire-stitched titles remember that larger paginations cause "bulking" resulting in the centre pages of the magazine being considerably shorter in width than the pages at the front and back. The uneven fore-edge is trimmed away after it is stitched. You may wish to allow a larger fore-edge margin in such cases or a larger margin in the backs to allow for "feathering" at the imposition stage. Pages that read across the spine cannot be feathered so attention must be paid to the fore-edge to avoid important content being trimmed away. Check with your Production Controller at Headley Brothers for advice on how to proceed.

Particular attention must be paid to the covers of perfect-bound magazines. The cover is glued along the spine and attached to the first and last page of the contents and can lose an area of around 6-8 mm in the "hinge". Check the Downloads Page for the PDF "DPS For Covers Template" that will guide you in dealing with this.

Perfect Binding
Paginations below 56 pages are not suitable for perfect binding. Depending on the weight and bulk of the paper, fewer pages than this do not produce a spine of a viable width for the perfect binding process. Please consult your Production Controller for advice.
Elements across spreads
Accurate alignment of elements that go across a spread cannot be guaranteed. Items that can look bad across spreads on a final printed result are: rules; tint edges (especially diagonals); text and lineart. If it is necessary to run a line of text across a spread make sure the spine falls between words.
This is even more evident in perfect-bound titles which cannot be opened out flat. There is always a certain amount of the page in the backs that cannot be seen. To overcome this, pages which cross a spread should be "thrown out". Check with your Production Controller at Headley Brothers for advice on how this is achieved.
Ink Rubbing
Ink can be transferred through abrasive contact on press and bindery handling systems during the manufacturing process. Matt and silk/satin papers are particularly susceptible to ink rubbing. Consideration can be given to this at the design stage. Where possible avoid facing pages of heavy ink coverage against white, unprinted pages.
Where possible avoid designs where the outside front cover is heavily inked and the outside back cover has large areas of white space or vice versa.
If this is unavoidable, consider a seal, which can sometimes prevent marking.
Web growth
Paper has a tendency to expand as it absorbs moisture and shrink when it loses moisture. In the heatset web offset process heat is applied to the paper in order to flash off solvent and dry the ink. After heating the paper is cooled, and a layer of silicone emulsion is applied to "recondition" it. The heating of the paper removes a percentage of the moisture content which cannot be replaced in the printing process. The width of the web will have reduced by several millimetres when it leaves the press, which results in about one millimetre of shrinkage per page.
In sheetfed printing the opposite occurs. Paper takes up water in the printing process and may stretch due to water absorption
It may be possible to minimise the impact of this effect by careful design of the cover and page one of the content. Speak to your Production Controller at Headley Brothers for advice.
Spell Check

When printing an image that has more than one color, depending on the method of printing, it is necessary to print the image one separate time for each separate color. Each one is called a "color run," and they can be pulled from the same surface, inked differently, or from a completely different surface. So that the final image is consistent, and so each of the colors lines up correctly, a system of registration is necessary. Different printing devices have different methods of creating separate color runs.
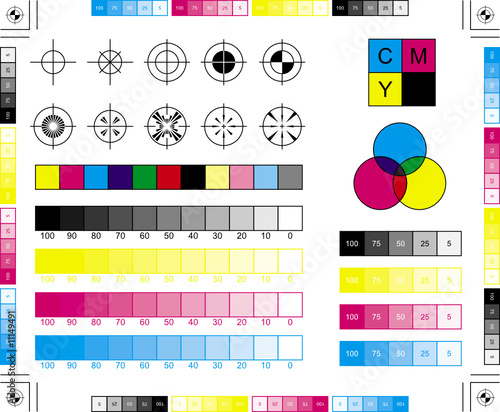
Registration Marks
The little circle with a cross through it is printed using every colour of the four-colour printing process. If they’re being printed accurately, they should overlap precisely so the mark looks entirely black. Therefore if any of the colours are slightly offset (out of register) then they’ll be displayed, showing the job isn’t being printed correctly.
Trim Marks
These are small lines which show exactly where the finished page will be cut during the finishing processes. They should display at the edge of each margin.
Colour Bars
Colour bars are printed outside the trim area and are used for quality control purposes by the printer. Squares of colour are printed on the area of the page to be trimmed off, which the printing press operator uses to check colour density and consistency is maintained. This checking process is automated by some printers, with digital scanners tracking the colour bars to ensure quality and consistency is maintained.

- images and graphics embedded by the client have been provided and are available to the application
- fonts are accessible to the system
- fonts are not corrupt
- fonts are in a compatible file format
- image files are of formats that the application can process
- image files are of the correct color format (some RIPs have problems processing RGB images, for example)
- image files are of the correct resolution
- required color profiles are included
- image files are not corrupt
- confirm that the page layout document size, margins, bleeds, marks and page information all fit within - the constraints of the output device and match the client specifications
- confirm that the correct colour separations or ink plates are being output
Other, more advanced pre-flight steps might also include:
- removing non-printing data, such as non-printing objects, hidden objects, objects outside the printable area and objects on layers below
- flattening transparent objects into a single opaque object
- converting fonts to paths
- gathering embedded image and graphic files to one location accessible to the system
- compressing files into an archive format
Mock-Ups

A mockup is a prototype if it provides at least part of the functionality of a system and enables testing of a design. Mock-ups are used by designers so they can see the design in printed format. This means that it is much easier to pick out any mistakes that would probably go un-noticed on screen.
A prepress proof uses ink jets, dyes, overlays or other methods to simulate the final printed piece.
A press proof uses the printing plates and inks specified for the job.
Proofing your work comes at various stages but there are specific types of proofs created during prepress and printing that allow the designer to see if their piece will come out as intended in the final printing. Different types of printing proofs are more accurate than others but with increased accuracy comes increased costs.
Saturation is an expression for the relative bandwidth of the visible output from a light source. In the diagram, the saturation is represented by the steepness of the slopes of the curves. Here, the red curve represents a color having low saturation, the green curve represents a color having greater saturation, and the blue curve represents a color with fairly high saturation. As saturation increases, colors appear more "pure." As saturation decreases, colors appear more "washed-out."
Brightness is a relative expression of the intensity of the energy output of a visible light source. It can be expressed as a total energy value (different for each of the curves in the diagram), or as the amplitude at the wavelength where the intensity is greatest (identical for all three curves). In the RGB color model, the amplitudes of red, green, and blue for a particular color can each range from 0 to 100 percent of full brilliance. These levels are represented by the range of decimal numbers from 0 to 255, or hexadecimal numbers from 00 to FF.
Resolution
Resolution is basically the measurement of how many dots/pixels fit into one inch.
DPI refers to a printed document, and the amount and spacing of the Cyan, Magenta, Yellow and Black dots
PPI refers to the pixels on a screen.
They aren’t the same thing, but designers and print professionals tend to use the terms DPI and PPI interchangeably. Sometimes they’ll say DPI but mean PPI.
For example, a 72dpi design for screen should really be referred to as 72ppi.

The higher resolution, the sharper the image will be. The recommended resolution is 300 dpi (dots per inch) for crisp, clear results as most printers are set to 300dpi or even 600dpi. Lower resolution images appear fuzzy, jagged and blurry.
Computer monitors are generally 72dpi and this is the default setting in photoshop. It is important you ensure all documents that are designed for print are set to at least 300dpi as it may look okay on screen at 72 but will look pixelated when printed.
Re-sizing & Resampling
As we know, resampling a document up is bad. Photoshop will have to guess what pixels to insert into the gaps. Resampling a document down is OK, as we’ve already got more than the amount of pixels we need.
If you Resize an image, you’ll keep the same pixel size, but alter the actual print size and the resolution.
Total Ink Density, or total area coverage as it is sometimes referred to, is the total amount of ink in one area of the page. For example, if the background of your piece is made up of 100C 80M 80Y 100K, the total ink density would be 360% for the background. Too much ink can cause appearance issues, such as muddy colors or ink puddling, and therefore total ink density needs to be capped at 290%. Source Interlink Media Prepress Department will reduce the ink density of any ads that are outside of our specification to 290%. Since color is subjective, it is important that the total ink density be adjusted prior to submitting your materials.
Best Results for Printing
Source Interlink Media has a total ink density requirement of 290%. Anything above this level will cause undesirable results in both reproduction and appearance. If large areas will use rich blacks it is recommended to keep your total ink density below 280%. Our recommended rich black is 60C 40M 40Y 100K.
There are a number of methods to adjust ink density. The best solution is to cap the ink density during conversion from RGB to CMYK using a color profile (such as the U.S. Web Uncoated v2 that comes with Photoshop); this will give you the greatest control over the color quality. If your images are already CMYK, you can use the following technique to adjust your ink density in Adobe Photoshop. It is also possible to convert your CMYK images back to RGB and then use a color profile to adjust the ink densities upon conversion back to CMYK, although this option may produce undesirable results.
Format & Compression
Image File Formats
Image File Compression
There are two types of image file compression algorithms: lossless and lossy.
Lossless compression algorithms reduce file size while preserving a perfect copy of the original uncompressed image. Lossless compression generally, but not exclusively, results in larger files than lossy compression. Lossless compression should be used to avoid accumulating stages of re-compression when editing images.
Lossy compression algorithms preserve a representation of the original uncompressed image that may appear to be a perfect copy, but it is not a perfect copy. Oftentimes lossy compression is able to achieve smaller file sizes than lossless compression. Most lossy compression algorithms allow for variable compression that trades image quality for file size.
.TIFF Vs .JPG
Tiff files are better quality, but jpeg files are smaller in size
JPEG
JPEG applies lossy compression to images, which can result in a significant reduction of the file size. The amount of compression can be specified, and the amount of compression affects the visual quality of the result. When not too great, the compression does not noticeably detract from the image's quality, but JPEG files suffer when repeatedly edited and saved. (JPEG also provides lossless image storage, but the lossless version is not widely supported.)
TIFF
TIFF (Tagged Image File Format) format is a flexible format that normally saves 8 bits or 16 bits per color (red, green, blue) for 24-bit and 48-bit totals, respectively, usually using either the TIFF or TIF filename extension. TIFF's flexibility can be both an advantage and disadvantage, since a reader that reads every type of TIFF file does not exist.
TIFFs can be lossy and lossless; some offer relatively good lossless compression for black and white images.
Some digital cameras can save in TIFF format, using the LZW compression algorithm for lossless storage. TIFF image format is not widely supported by web browsers. TIFF remains widely accepted as a photograph file standard in the printing business. TIFF can handle device-specific color spaces, such as the CMYK defined by a particular set of printing press inks.
Fonts
True Type
Outlines
Using for Print
It it useful to use TrueType fonts for print because they was purposely designed to look exactly the same on paper as they do on screen.
Serif Vs Sans Serif
While some sources say sans-serif fonts have existed since the 5th century BC, it wasn't until the 1920s that they became somewhat popular – mostly being used in advertisements.
It's been said that serif fonts are for "readability," while sans-serif fonts are for "legibility." Which is why, in print, sans-serif fonts are often used as the headline font and serif fonts are used for the body text.
In his book Cashvertising, Drew Eric Whitman cites a 1986 study of fonts (printed on paper) that found only 12 percent of participants effectively comprehended a paragraph set in sans-serif type versus 67 percent who were given a version set in serif typeface.
Those who read the sans-serif version said they had a tough time reading the text and "continually had to backtrack to regain comprehension."
Reversed Out Lettering
Reversed 1-1 out lettering, or knocked-out type, should be out of a minimum of colours. Type or objects smaller than 10pt in size should ideally be reversed out of one colour only. Small letters reversed out of multiple colours - particularly fonts with fine serifs - will show colour in white type areas even with the slightest mis-registration on press. Check to ensure that reversed-out lettering does not become illegible due to the text's background.
Tints and backgrounds
If you wish to reproduce a large solid black background I would recommend that the black prints at 100 per cent, along with a 40 per cent cyan tint to provide more density. This is often referred to as a "shiner", and produces what is sometimes called a "rich black".
The inclusion of a common colour background or strap heading across several pages of a feature or sections of a magazine can draw attention to the natural minor variations in colour balance that occur across a press/presses and during a press run. This can be minimised by creating these common colours out of as few process colours as possible. Give careful consideration to the use of one, or perhaps two colours to produce the common colour. Such a colour will enable a more consistent reproduction than the same object defined using all four process colours. However, certain two-colour combinations can also be prone to unattractive colour shifts - particularly when both colour values are midtones. Two-colour combinations where one colour is considerably higher than the other prove more stable, producing a more consistent, balanced result.
To assure accurate reproduction on press it is advisable to supply a colour swatch or contract-colour proof.
Tracking
Tracking occurs when ink is consumed by an area of a sheet with a high percentage of one or more colours, creating a deficiency of that colour within a later area running in track. This effect is more evident on heavy tint areas running across the sheet. To avoid the effects of tracking it is important to consider the final imposition and design your layout accordingly.
Black overprint
100% black elements will automatically overprint other colours. This prevents normal black text knocking "holes" in tints. Therefore, it is important that larger 100% black page elements, such as boxes or very large point size text, do not have variations in colour beneath them. These will show through in the printed page. Alternatively a "shiner" (see above) can be used to produce a heavier, more consistent solid. If a black element is overprinting a four-colour image, include at least 1% pf CMY in your black to ensure the picture does not show through the black.
Trims and Bleeds
All page content that runs to the edge of the page must extend off the page by a minimum distance of 3 mm. This minimum distance is referred to as bleed. If bleed is not applied there is a risk of an unsightly white area appearing at the bleed edge.
Elements that do not bleed should be a minimum distance of 5 mm from the edge of the page. This is referred to as the margin. Elements closer to the edge than this standard risk being trimmed off during the finishing process.
Do not attempt to place text sitting exactly on the trim - you will almost certainly be disappointed with the finished trimmed result.
Consideration should be given to the binding style when setting the margins.
For perfect-bound titles consideration should be given for the area in the backs lost in the spine glueing.
For wire-stitched titles remember that larger paginations cause "bulking" resulting in the centre pages of the magazine being considerably shorter in width than the pages at the front and back. The uneven fore-edge is trimmed away after it is stitched. You may wish to allow a larger fore-edge margin in such cases or a larger margin in the backs to allow for "feathering" at the imposition stage. Pages that read across the spine cannot be feathered so attention must be paid to the fore-edge to avoid important content being trimmed away. Check with your Production Controller at Headley Brothers for advice on how to proceed.
Particular attention must be paid to the covers of perfect-bound magazines. The cover is glued along the spine and attached to the first and last page of the contents and can lose an area of around 6-8 mm in the "hinge". Check the Downloads Page for the PDF "DPS For Covers Template" that will guide you in dealing with this.
Perfect Binding
Paginations below 56 pages are not suitable for perfect binding. Depending on the weight and bulk of the paper, fewer pages than this do not produce a spine of a viable width for the perfect binding process. Please consult your Production Controller for advice.
Elements across spreads
Accurate alignment of elements that go across a spread cannot be guaranteed. Items that can look bad across spreads on a final printed result are: rules; tint edges (especially diagonals); text and lineart. If it is necessary to run a line of text across a spread make sure the spine falls between words.
This is even more evident in perfect-bound titles which cannot be opened out flat. There is always a certain amount of the page in the backs that cannot be seen. To overcome this, pages which cross a spread should be "thrown out". Check with your Production Controller at Headley Brothers for advice on how this is achieved.
Ink Rubbing
Ink can be transferred through abrasive contact on press and bindery handling systems during the manufacturing process. Matt and silk/satin papers are particularly susceptible to ink rubbing. Consideration can be given to this at the design stage. Where possible avoid facing pages of heavy ink coverage against white, unprinted pages.
Where possible avoid designs where the outside front cover is heavily inked and the outside back cover has large areas of white space or vice versa.
If this is unavoidable, consider a seal, which can sometimes prevent marking.
Web growth
Paper has a tendency to expand as it absorbs moisture and shrink when it loses moisture. In the heatset web offset process heat is applied to the paper in order to flash off solvent and dry the ink. After heating the paper is cooled, and a layer of silicone emulsion is applied to "recondition" it. The heating of the paper removes a percentage of the moisture content which cannot be replaced in the printing process. The width of the web will have reduced by several millimetres when it leaves the press, which results in about one millimetre of shrinkage per page.
In sheetfed printing the opposite occurs. Paper takes up water in the printing process and may stretch due to water absorption
.
When sheetfed covers are bound with web offset sections, the covers are trimmed flush with the inner sections. After the trimming the covers release moisture into the air and the web offset sections absorb moisture from the air. The covers may shrink slightly and the web sections will grow and hence show a difference in size. Since the industry-accepted best-practice is to run paper grain parallel to the spine, web growth beyond the sheetfed cover will normally be evident on the fore-edge.
This effect is common within the printing industry and is most often seen when sheetfed covers are bound with web offset sections.
It may be possible to minimise the impact of this effect by careful design of the cover and page one of the content. Speak to your Production Controller at Headley Brothers for advice.
Spell Check
important for obvious reasons. everything needs to be SPELL CHECKED!
Printer Marks
Registration
In colour printing, registration is the method of correlating overlapping colors on one single image. There are many different styles and types of registration, many of which employ the alignment of specific marks.
Purpose
Registration Marks
The little circle with a cross through it is printed using every colour of the four-colour printing process. If they’re being printed accurately, they should overlap precisely so the mark looks entirely black. Therefore if any of the colours are slightly offset (out of register) then they’ll be displayed, showing the job isn’t being printed correctly.
Trim Marks
These are small lines which show exactly where the finished page will be cut during the finishing processes. They should display at the edge of each margin.
Colour Bars
Colour bars are printed outside the trim area and are used for quality control purposes by the printer. Squares of colour are printed on the area of the page to be trimmed off, which the printing press operator uses to check colour density and consistency is maintained. This checking process is automated by some printers, with digital scanners tracking the colour bars to ensure quality and consistency is maintained.
Pre Flight Checks
Pre-flighting is a term used in the printing industry to describe the process of confirming that the digital files required for the printing process are all present, valid, correctly formatted, and of the desired type. The term originates from the pre-flight checklist used by pilots. The term was first used in a presentation at the Color Connections conference in 1990 by consultant Chuck Weger.
The process of preflighting a print job helps reduce the likelihood of rasterization problems that cause production delays. Page layout software applications, (which allow users to combine images, graphics, and text from a variety of formats,) automate portions of the pre-flight process. Typically, client provided materials are verified by a pre-flight operator for completeness and to confirm the incoming materials meet the production requirements.
The pre-flight process checks for:
- fonts are accessible to the system
- fonts are not corrupt
- fonts are in a compatible file format
- image files are of formats that the application can process
- image files are of the correct color format (some RIPs have problems processing RGB images, for example)
- image files are of the correct resolution
- required color profiles are included
- image files are not corrupt
- confirm that the page layout document size, margins, bleeds, marks and page information all fit within - the constraints of the output device and match the client specifications
- confirm that the correct colour separations or ink plates are being output
Other, more advanced pre-flight steps might also include:
- removing non-printing data, such as non-printing objects, hidden objects, objects outside the printable area and objects on layers below
- flattening transparent objects into a single opaque object
- converting fonts to paths
- gathering embedded image and graphic files to one location accessible to the system
- compressing files into an archive format
Mock-Ups

Mock-ups address the idea captured in a popular engineering one-liner:
"You can fix it now on the drafting board with an eraser or you can fix it later on the construction site with a sledge hammer."

Getting sign-off, in writing, is a vital part of best practice when sending designs, copy or code to clients. If changes need to be made later then, with sign-off completed, it is the client’s responsibility — not yours. If, for example, there is a typo in a design for a flyer (perhaps the date is wrong!) and the client spots the mistake *after* printing 1000s of copies the responsibility for the cost of re-printing is the clients… not yours.
Client Sign Off
It is well established in law that by signing-off artwork the client accepts final responsibility for it. It means that, under normal circumstances, re-printing becomes a client’s responsibility once your artwork has been approved.
Observing best practice in the design and marketing business means obtaining sign-off from your client before artwork goes into production.
Once the client has signed off the artwork you are no longer responsible for it. It means that your Professional Indemnity insurance will not meet a claim for reprint (for example), because it would be the client’s responsibility (or possibly the printer’s if the reprint was the result of a straightforward printing error).
The best way to protect your interests is to ensure that your standard Terms and Conditions carry reference to sign-off and the client’s responsibility.
If, however, a client tried to blame you and attempted to make a claim against you, even if you weren’t at fault, then your Professional Indemnity would defend you. This would also be the case if the client simply refused to pay you, and threatened to counterclaim if you pursued the debt.
If for some reason you can’t obtain a sign-off or the client makes a last minute verbal amendment, you should acknowledge the amendment in writing (by letter, email or fax). You could attach a proforma template that points out that, if the client is unable to sign-off the final artwork; you accept no responsibility for errors that may subsequently occur.
If you inadvertently failed to obtain sign-off and there turned out to be an error in the artwork, you would still be covered. However, you should always try to observe best practice.

A general term for a variety of options for seeing what your file will look like when printed is a proof. Think of it as evidence (proof) that what you put into your digital file will all come out on the printed page exactly as you intend: the right fonts, graphics, colors, margins, and overall positioning.
Printing proofs are used for checking that all text and graphics and coluors come out as expected before going to press. It is a good practice to print a proof from your desktop printer and send along with your digital files to your service bureau or commercial printer. They can be black and white or in color but a good PostScript laser proof is ideal. If the file won't print properly to a desktop printer, chances are it won't come out on the printer press correctly either.
Observing best practice in the design and marketing business means obtaining sign-off from your client before artwork goes into production.
Once the client has signed off the artwork you are no longer responsible for it. It means that your Professional Indemnity insurance will not meet a claim for reprint (for example), because it would be the client’s responsibility (or possibly the printer’s if the reprint was the result of a straightforward printing error).
The best way to protect your interests is to ensure that your standard Terms and Conditions carry reference to sign-off and the client’s responsibility.
If, however, a client tried to blame you and attempted to make a claim against you, even if you weren’t at fault, then your Professional Indemnity would defend you. This would also be the case if the client simply refused to pay you, and threatened to counterclaim if you pursued the debt.
If for some reason you can’t obtain a sign-off or the client makes a last minute verbal amendment, you should acknowledge the amendment in writing (by letter, email or fax). You could attach a proforma template that points out that, if the client is unable to sign-off the final artwork; you accept no responsibility for errors that may subsequently occur.
If you inadvertently failed to obtain sign-off and there turned out to be an error in the artwork, you would still be covered. However, you should always try to observe best practice.
Printing Proofs
A prepress proof uses ink jets, dyes, overlays or other methods to simulate the final printed piece.
A press proof uses the printing plates and inks specified for the job.
Proofing your work comes at various stages but there are specific types of proofs created during prepress and printing that allow the designer to see if their piece will come out as intended in the final printing. Different types of printing proofs are more accurate than others but with increased accuracy comes increased costs.

Leave your comment